In the realm of operating systems, Windows XP holds a special place in the hearts of many users, despite its age and the availability of newer alternatives. Whether it’s for nostalgia, legacy software compatibility, or simply familiarity, installing Windows XP can be a rewarding endeavor. In this comprehensive guide, we’ll walk you through the process of installing Windows XP on your computer, ensuring a smooth and hassle-free experience.
Introduction
Windows XP, released by Microsoft in 2001, was a groundbreaking operating system known for its stability, simplicity, and user-friendly interface. While Microsoft ended support for Windows XP in 2014, many users still seek to install it for various reasons, such as running older software or reviving older hardware.
System Requirements
Before diving into the installation process, it’s essential to ensure that your computer meets the minimum system requirements for Windows XP. These include:
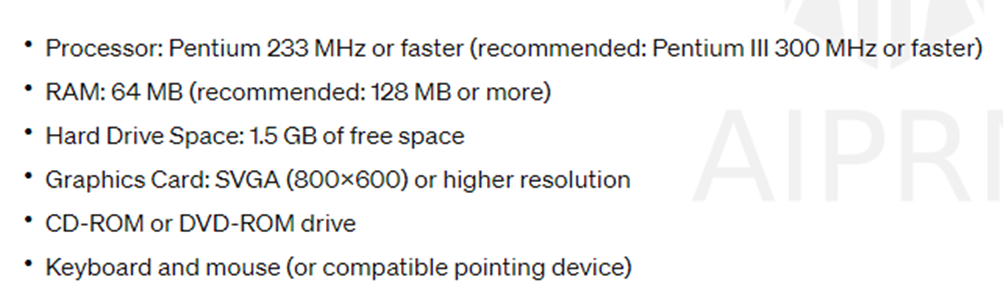 |
Preparing for Installation
- Backup Your Data: Before proceeding with the installation, it’s crucial to back up any important files and data stored on your computer to prevent data loss during the installation process.
- Create a Bootable Installation Disc or USB Drive: You’ll need a bootable installation disc or USB drive containing the Windows XP setup files. You can create one using disk imaging software like Rufus or by using the original Windows XP installation disc.
Installation Process
- Boot from the Installation Disc or USB Drive: Insert the bootable installation disc or USB drive into your computer and restart it. Press any key when prompted to boot from the disc or USB drive.
- Partition the Hard Drive: During the installation process, you’ll be prompted to partition your hard drive. You can choose to create a new partition or install Windows XP on an existing partition.
- Format the Partition: Once you’ve selected the partition for installation, you’ll need to format it using the NTFS file system. This will erase any existing data on the partition, so be sure to back up important files beforehand.
- Copy System Files: The installation wizard will then copy system files from the installation disc or USB drive to your hard drive. This process may take several minutes, depending on your computer’s speed.
Setting Up User Accounts and Preferences
- Create User Accounts: Follow the on-screen instructions to create user accounts for yourself and other users who will be using the computer. You can set up passwords and user privileges during this step.
- Customize System Settings: Configure system settings such as display resolution, time zone, language preferences, and network configuration to suit your preferences and requirements.
Installing Device Drivers
Install Device Drivers: After completing the installation of Windows XP, you’ll need to install device drivers for hardware components such as the graphics card, sound card, and network adapter. You can use driver installation CDs included with hardware components or download drivers from manufacturers’ websites.
Activating Windows XP
Activate Windows XP: Once the installation is complete, you’ll need to activate Windows XP to access all features and receive updates. You can activate Windows XP online or by phone using the product key provided with the installation disc.
Post-Installation Tasks
Install Essential Software and Updates: After activating Windows XP, install essential software such as web browsers, productivity tools, and security software. Be sure to also install the latest service packs and security updates from Microsoft’s website to ensure optimal performance and security.
Legacy Software Compatibility
While Windows XP is no longer supported by Microsoft, some users may still need to install it for compatibility with legacy software or hardware. Virtualization software such as VMware or VirtualBox can be used to run Windows XP as a virtual machine on modern operating systems, providing compatibility without sacrificing security.
5 Interesting Facts About Windows XP Installation:
- Windows XP was the first version of Windows to introduce the concept of product activation, requiring users to enter a unique product key during installation to verify the authenticity of their copy.
- Despite being released over 20 years ago, Windows XP still holds a significant market share in some regions, with estimates suggesting that over 1% of all desktop computers still run Windows XP as of 2021.
- The “Bliss” desktop wallpaper, featuring a rolling green hill and blue sky, became one of the most iconic images associated with Windows XP. It was photographed by Charles O’Rear in Sonoma County, California.
- Windows XP was the first version of Windows to include built-in support for wireless networking, making it easier for users to connect to Wi-Fi networks without third-party software or drivers.
- Microsoft officially ended support for Windows XP on April 8, 2014, after 12 years of continuous support. Despite the end of support, Windows XP remains a popular choice for some users due to its simplicity and familiarity.
Conclusion
Installing Windows XP may seem like a blast from the past, but for many users, it’s a nostalgic journey or a practical solution for running legacy software. By following this step-by-step guide, you can install Windows XP on your computer with confidence.